How to convert WebM to MP4 in Chrome (locally, no upload)
Convert screen recordings from WebM to MP4 in Chrome with Showesome — open preview, click Convert to MP4, FFmpeg runs on your device. No cloud upload, no watermark.
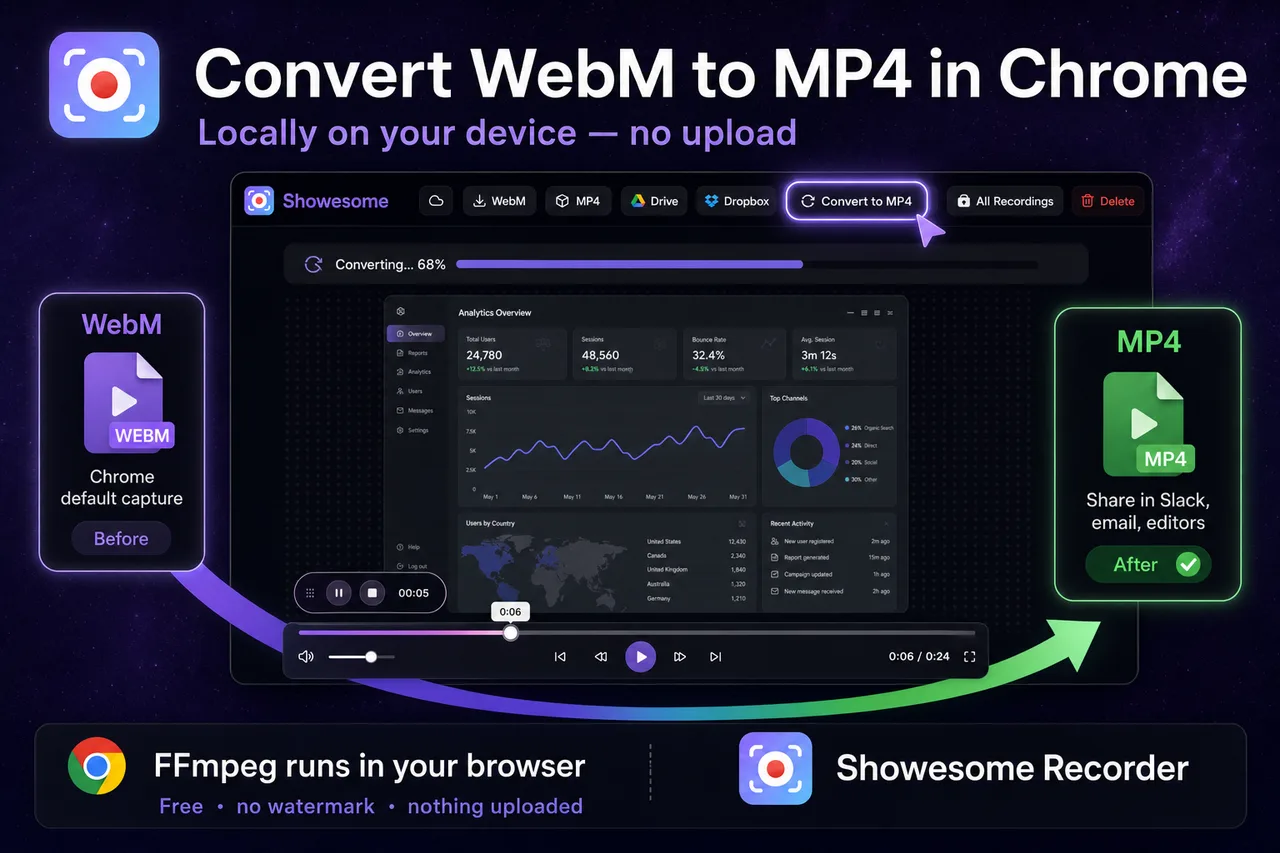
Yes — you can convert WebM to MP4 in Chrome without uploading your video. In Showesome, open a recording in preview, click Convert to MP4, and FFmpeg runs locally on your device. When conversion finishes, use Download MP4 — nothing is sent to a cloud converter.
Chrome screen recorders (including Showesome) save captures as WebM by default. Many editors, LMS tools, and email clients prefer MP4. This guide covers the Showesome preview flow, when you need conversion, and how local export compares to online WebM-to-MP4 sites.
Why recordings start as WebM
| Format | Why it shows up |
|---|---|
| WebM | Chrome’s native MediaRecorder output — efficient in the browser |
| MP4 | Better compatibility with video editors, PowerPoint, Slack attachments, and some mobile players |
Showesome keeps the original WebM in your Recordings History until you delete it. Convert to MP4 creates a share-ready copy on your device — you can still Download WebM if you want the original.
Convert WebM to MP4 in Showesome (step by step)
- Finish a recording and open Recordings History from the Showesome popup (or click Last Recording in statistics).
- Click the clip to open preview — playback starts automatically.
- In the preview header, click Convert to MP4.
- Wait for the progress indicator in the tab. Conversion runs locally with FFmpeg — not on Showesome servers.
- Click Download MP4 to save a file to your computer (or use Upload to Cloud if you connected Drive, Dropbox, or YouTube).
You can also start conversion from Recordings History list rows, but preview is the best place to watch the take first, then export the version you actually want.
Tip: Convert once, download once, then share. Re-converting the same clip is unnecessary unless you changed the recording.
When you need Convert to MP4 (and when you do not)
| Recording type | Do you need Convert to MP4? |
|---|---|
| Screen Only or Screen + Camera | Usually yes before sharing outside Chrome |
| Camera Only (no background change) | Yes for MP4 download |
| Camera Only after virtual background processing | Often no extra step — processed clip is already MP4 (virtual backgrounds guide) |
For the full preview workflow (cloud upload, delete, rename), see Preview, export, and optional cloud backup.
Local conversion vs online WebM-to-MP4 converters
| Showesome (preview) | Typical cloud converter site | |
|---|---|---|
| Where conversion runs | Your Chrome tab / device | Their servers |
| Upload required | No | Yes — you send the full file |
| Privacy | Recording stays on your machine | Third party may retain uploads |
| Watermark | No watermark on Showesome exports | Varies; some free tiers add branding |
| Best for | Clips you already recorded in Showesome | One-off files from another tool |
If your clip is already in Showesome, preview is faster and more private than dragging the same file into a random converter tab.
Troubleshooting
| Problem | What to try |
|---|---|
| Convert to MP4 is greyed out or missing | Refresh preview; confirm the recording finished saving |
| Conversion stuck or very slow | Long or high-resolution clips take more CPU — keep the tab open; close heavy tabs |
| MP4 plays but WebM was fine | Normal — some apps only accept MP4; you converted for compatibility |
| No audio in exported MP4 | See Screen recording has no sound? — conversion does not fix a silent source track |
| Need a clip from another recorder | Export WebM from that tool, or use a desktop converter — this guide is for Showesome’s library |
Can I convert WebM to MP4 without Showesome?
Yes — with other tools — but not inside Chrome’s built-in screen capture. Options include desktop apps (HandBrake, VLC), paid editors, or upload-based converter websites. Showesome’s angle is convert where you already recorded: no extra upload step if the clip is in your library.
Do I need an internet connection to convert?
Not for the FFmpeg step itself once Showesome’s conversion worker is available in your extension build. You need connectivity to install or update the extension; the actual Convert to MP4 job runs on your device.
Related reading
- Preview, export, and optional cloud backup — full preview header actions and cloud upload.
- Your recordings library — open clips from Compact, Large, or List view.
- How to record your screen on Chrome (2026) — install through first export.
- Support — FAQs on preview, MP4, and download.
Quick checklist
- Record in Showesome → clip appears in Recordings History.
- Open preview and confirm it is the right take.
- Click Convert to MP4 → wait for local processing.
- Download MP4 and share through your usual channel.
- Optional: Upload to Cloud for Drive, Dropbox, or YouTube backup.
Was this guide helpful?
One vote per browser. No account required.
Be the first to share feedback.
Comments
Join the discussion — comments are moderated to keep things helpful. Be respectful and constructive.
Preparing sign-in…