How to record your screen on Chrome (2026)
Record your screen in Chrome with Showesome — install the extension, pin it, pick tab/window/screen in Chrome’s share dialog, narrate with your mic, and export MP4 locally. Free, no watermark.
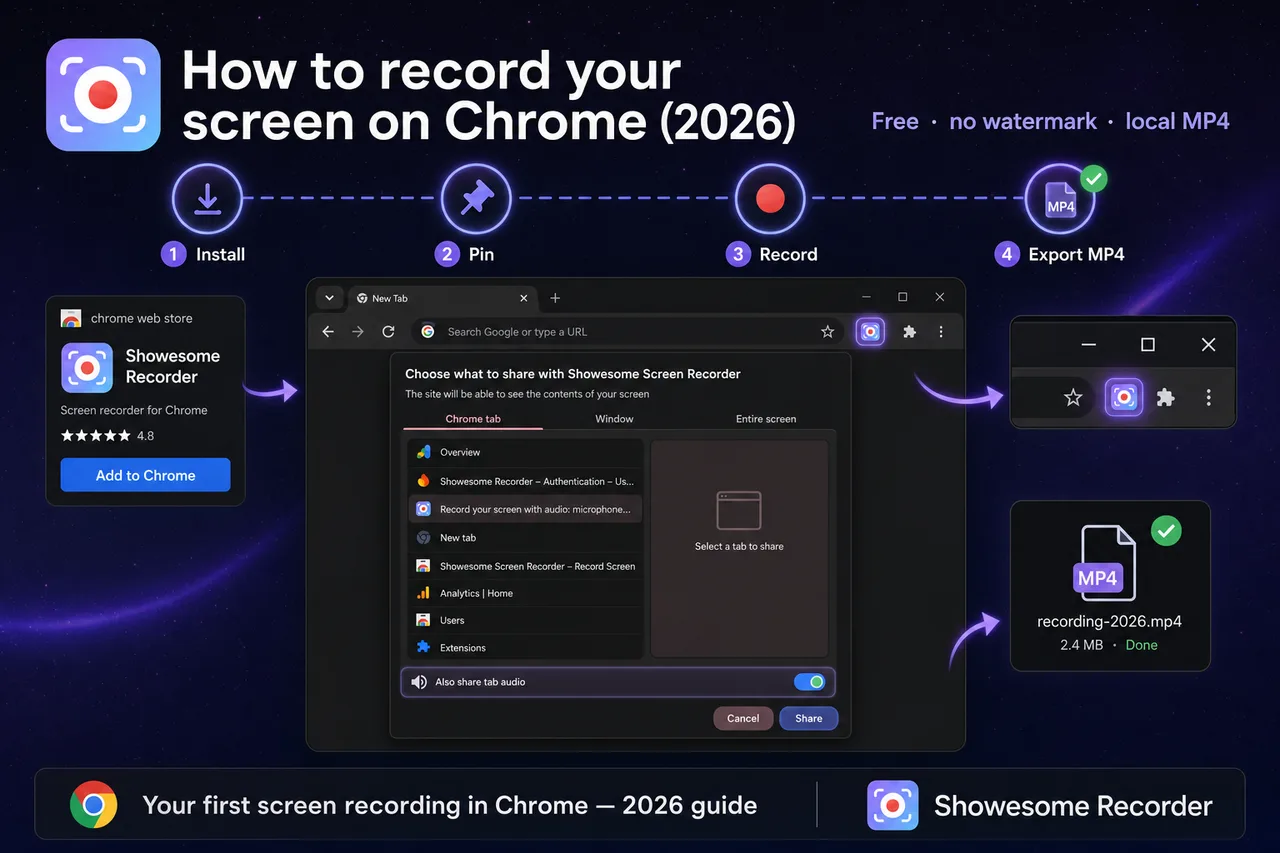
Yes — you can record your screen in Chrome. Install Showesome Screen Recorder, pin it on the toolbar, click Start Recording, choose a tab, window, or entire screen in Chrome’s share dialog, and stop when you are done. Your clip saves locally — export MP4 with no watermark.
This is the full first-recording walkthrough for 2026: install through export, with links to deeper guides for audio, webcam, and troubleshooting.
Open on watch page (for search and full-screen viewing)
What you need
| Requirement | Notes |
|---|---|
| Google Chrome (or Chromium browser) | Showesome is a Chrome extension — not Safari or Firefox |
| Showesome installed | Chrome Web Store — free |
| Permissions | Allow screen, camera (if using webcam), and microphone (if narrating) when Chrome prompts |
| A few minutes | First recording including install takes about 5 minutes |
No separate desktop app or OBS required for standard screen captures in Chrome.
1. Install Showesome from the Chrome Web Store
- Open the Showesome Screen Recorder listing.
- Click Add to Chrome → Add extension.
- When install finishes, look for the Showesome icon near the address bar (it may be inside the Extensions menu until you pin it).
Showesome is free with no watermark and no five-minute cap like some cloud recorders — see best free Chrome screen recorders (2026) for how it compares.
2. Enable and pin the extension
If you do not see the icon:
- Click the puzzle piece (Extensions) next to the address bar.
- Open Manage Extensions → confirm Showesome is on.
- Click pin so the Showesome logo stays on the toolbar.
Full steps with screenshots: Enable and pin Showesome in Chrome.
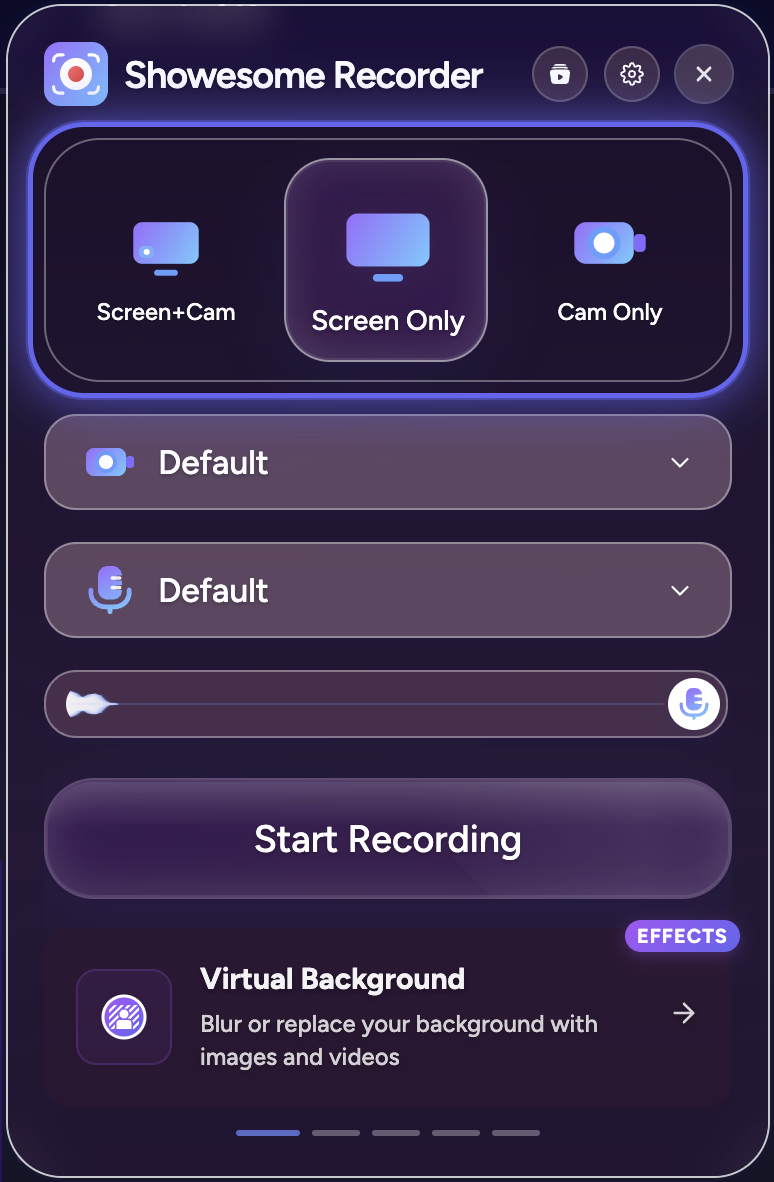
3. Choose a recording mode
Click the Showesome icon to open the popup. Pick how you want to capture:
| Mode | What it records |
|---|---|
| Screen + Camera | Your display and webcam in a draggable bubble |
| Screen Only | Display capture only — no camera bubble |
| Camera Only | Webcam full frame — no screen |
For a plain screen walkthrough, Screen Only is enough. For tutorials with your face, use Screen + Camera — recording modes guide.
Set Microphone (and Camera if needed) in the popup. Toggle mute off when you want narration — details in record screen with audio.
Screen Only for a simple capture
Select Screen Only at the top of the popup, choose your microphone, then click Start Recording.
4. Start recording and pick what to share
- Click Start Recording in the popup.
- Chrome opens its share dialog. Choose one:
| Option | Best for |
|---|---|
| Chrome tab | One tab — demos, docs, YouTube, Google Slides |
| Window | A single app window |
| Entire screen | Full desktop (all monitors visible to Chrome) |
- If the tab plays video or meeting audio you need in the file, turn on Also share tab audio before you confirm.
- Click Share to begin.
Your capture starts immediately. Use the floating control bar or shortcuts (Alt+Shift+S stop, Alt+Shift+P pause) — keyboard shortcuts guide.
For tab-audio setup, see record a Chrome tab with audio.
5. Record your walkthrough
- Narrate as you click — viewers follow your voice.
- Screen + Camera? Drag the webcam bubble away from important UI.
- Tutorials? Double-tap Cmd/Ctrl for Focus Mode — click to spotlight and auto-zoom on buttons or text.
When you are done, click Stop on the control bar or press Alt+Shift+S.
6. Preview and export MP4
- Open Recordings History from the Showesome popup.
- Click your clip to preview playback.
- Use Convert to MP4 or Download — processing runs locally on your device. Convert WebM to MP4 in Chrome.
Optional: upload to Google Drive, Dropbox, or YouTube when you connect accounts — nothing uploads automatically. Preview and optional cloud.
Can I record my screen in Chrome without an extension?
Chrome can capture a single tab from developer tools or some OS shortcuts, but there is no full built-in recorder with mic mix, webcam bubble, pause/stop controls, and local MP4 export in one flow.
For anything beyond a one-off tab clip, a Chrome extension like Showesome is the practical path — compare options in choosing a screen recorder.
Does Chrome screen recording need OBS?
No for everyday tutorials, demos, and async updates in the browser. OBS still wins for multi-source streaming and broadcast production — but most Chrome users do not need it for “record this tab and explain it.”
Recording blocked or no sound?
| Problem | Fix |
|---|---|
| Share dialog never appears / permission denied | Chrome permissions fix guide |
| Recording works but no voice or tab sound | Screen recording has no sound? |
| Icon missing | Enable and pin Showesome |
Record a 10-second test clip after each fix before a long session.
Quick checklist
- Install Showesome from the Chrome Web Store.
- Pin the extension on the toolbar.
- Pick Screen Only or Screen + Camera and set microphone.
- Start Recording → choose tab, window, or screen → Share.
- Turn on Also share tab audio when the tab plays sound.
- Stop → preview in Recordings History → export MP4.
Related reading
- Getting Started — interactive walkthrough from install to first export.
- Record screen + webcam in Chrome — picture-in-picture bubble.
- Record your screen with audio — mic, mute, tab sound.
- Best free Chrome screen recorders (2026) — comparison list.
- Support — FAQs and troubleshooting.
Was this guide helpful?
One vote per browser. No account required.
Be the first to share feedback.
Comments
Join the discussion — comments are moderated to keep things helpful. Be respectful and constructive.
Preparing sign-in…