Auto zoom for screen recordings in Chrome (without editing)
Use Showesome Focus Mode in Chrome to click-to-zoom on buttons, text, and UI areas while you record — smooth spotlight zoom in the MP4, no post-production keyframes.

Yes — you can auto zoom a screen recording in Chrome without opening an editor. In Showesome, turn on Focus Mode, click a control or select text, and the extension spotlights and smoothly zooms that target while you record. The zoom is baked into the MP4 — not a cursor-follow effect you add later.
This guide explains what “auto zoom” means for tutorials, how Focus Mode works, and the shortcuts to use while you record.
Open on watch page (for search and full-screen viewing)
What is auto zoom for screen recordings?
Auto zoom (sometimes called click to zoom or zoom on click) means the recorder magnifies the part of the screen you care about at the moment you choose it — usually with a smooth animation and dimmed surroundings so viewers know where to look.
Showesome does this with Focus Mode:
- Click a button, link, or panel to spotlight it and zoom in.
- Select text to zoom readable copy, error messages, or code.
- Shift + drag to draw a rectangular area when several controls belong together.
Focus Mode is not continuous mouse-tracking zoom. You direct attention, then Showesome runs the zoom automatically — which keeps tutorials calm and intentional instead of seasick.
For practical tips once you know the basics, see Five Focus Mode tips.
How to use auto zoom while recording in Chrome
1. Install Showesome and start a recording
- Add Showesome Screen Recorder from the Chrome Web Store.
- Pick Screen Only, Screen + Camera, or Camera Only depending on your clip — recording modes guide.
- Click Start Recording, choose what to share in Chrome’s dialog, and begin your walkthrough.
Focus Mode works during an active recording (and in the interactive Focus tutorial).
2. Turn on Focus Mode
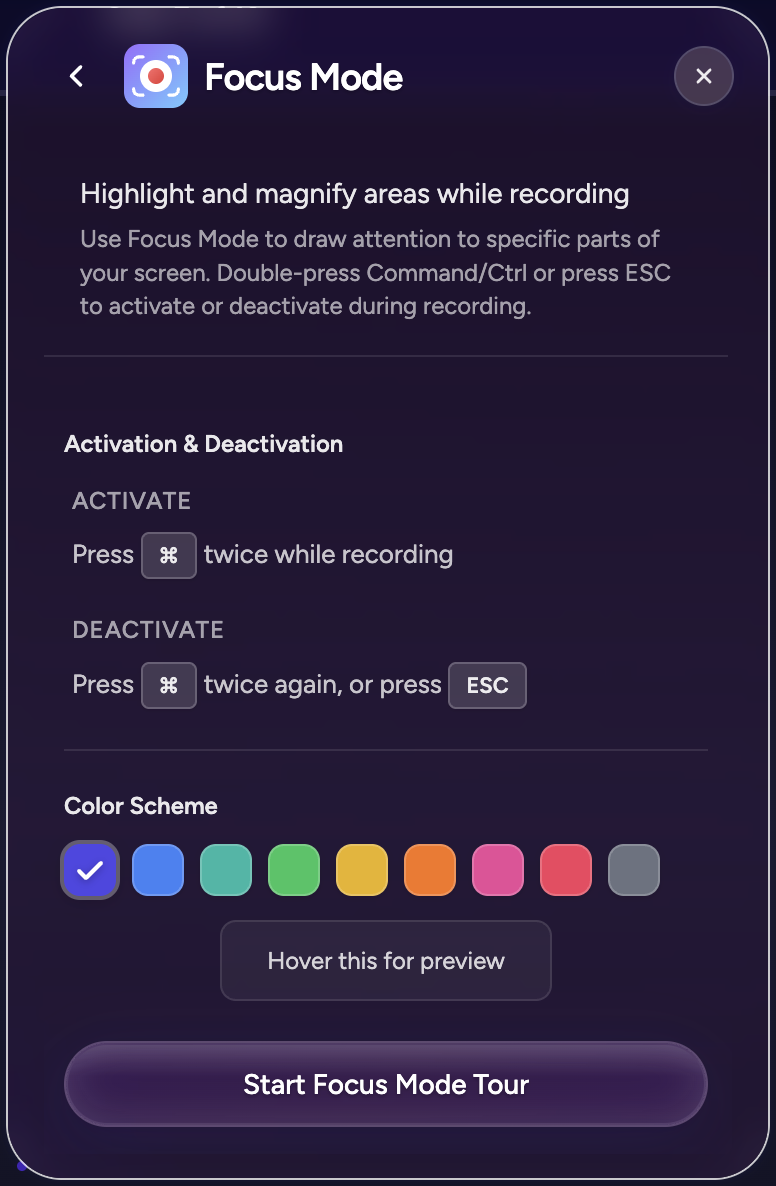
Double-tap Cmd (Mac) or Ctrl (Windows/Linux) to enter Focus Mode.
You can toggle it on and off the same way — no need to open the popup mid-demo. Practice the double-tap before you record so the transition feels natural.
Spotlight color in the popup
Open Showesome before you record to pick a spotlight color under Focus Mode settings — the same control shown in Getting Started step 6.
3. Click, select, or draw to zoom
With Focus Mode active:
| Action | Result |
|---|---|
| Click a UI element | Spotlight + smooth zoom on that control |
| Select text on the page | Zoom framed on the selection — great for labels and snippets |
| Shift + drag | Rectangular area spotlight for toolbars or form sections |
Press Esc, or double-tap Cmd/Ctrl again, to leave Focus Mode and return to the full frame.
4. Stop and export
End the recording from the control bar or Alt+Shift+S. Open Recordings History to preview — the zooms are already in the capture. Convert or download MP4 locally when you are ready.
Is Focus Mode the same as auto zoom?
Yes, for Showesome. Creators search for “auto zoom screen recording” or “screen recorder that zooms when you click”; Focus Mode is Showesome’s name for that behavior. You choose the target; the extension handles spotlight, dimming, and smooth zoom during capture.
It is different from:
- Post-production zoom in Premiere, CapCut, or iMovie — keyframes added after you finish.
- Always-on cursor zoom — some tools chase the pointer; Focus Mode zooms only what you click or select.
Focus Mode vs editing arrows and circles
| Focus Mode (during capture) | Editing after capture | |
|---|---|---|
| When you act | While recording | In a video editor |
| Viewer experience | Smooth in-frame zoom | Arrows, crops, or keyframes |
| Best for | Software tutorials, bug repros, async updates | Polished marketing films |
| Showesome workflow | Built into the Chrome extension | Optional — many clips need no editor |
If your goal is clear tutorials without heavy post work, capture-time zoom usually beats re-recording because “they could not see the button.”
Which recording mode works with auto zoom?
Focus Mode applies to what is on screen in your capture:
- Screen Only — UI walkthroughs and docs.
- Screen + Camera — same zoom on the display; your webcam bubble stays visible.
- Camera Only — zoom targets the camera frame (less common for “click this button” demos).
Keyboard shortcuts recap
| Shortcut | Action |
|---|---|
| Double-tap Cmd / Ctrl | Toggle Focus Mode |
| Esc | Exit Focus Mode |
| Shift + drag | Area spotlight |
| Alt+Shift+S | Start / stop recording |
| Alt+Shift+P | Pause / resume |
Full list: keyboard shortcuts guide.
Can Chrome screen recorders zoom when I click?
A few Chrome extensions advertise click-to-zoom or auto zoom for tutorials. Showesome includes it as Focus Mode with element click, text selection, and area spotlight — plus local MP4 export, no watermark, and optional virtual backgrounds.
Compare broader options in choosing a screen recorder or the free Loom alternative guide if you are evaluating tools.
Quick checklist
- Pin Showesome and start a screen recording.
- Double-tap Cmd/Ctrl to enter Focus Mode.
- Click, select text, or Shift-drag an area to auto zoom.
- Press Esc or double-tap again when you want full frame back.
- Stop → preview in Recordings History → export MP4.
Related reading
- Five Focus Mode tips for better tutorials — shortcuts, pacing, and workflow ideas.
- Interactive Focus Mode tutorial — try spotlight and zoom in the browser.
- Building a recorder that guides attention — why capture-time focus matters.
- Engaging tutorials without heavy editing — combine Focus Mode with bubble placement and pacing.
- Record screen + webcam in Chrome — Screen + Camera with a draggable bubble.
- Getting Started — install through first export.
- Support — FAQs for Focus Mode, shortcuts, and recording issues.
Was this guide helpful?
One vote per browser. No account required.
Be the first to share feedback.
Comments
Join the discussion — comments are moderated to keep things helpful. Be respectful and constructive.
Preparing sign-in…