How to record screen + webcam in Chrome (picture-in-picture bubble)
Record your screen and face together in Chrome with Showesome — pick Screen + Camera, allow Chrome to share your display, and drag the webcam bubble anywhere on the capture.
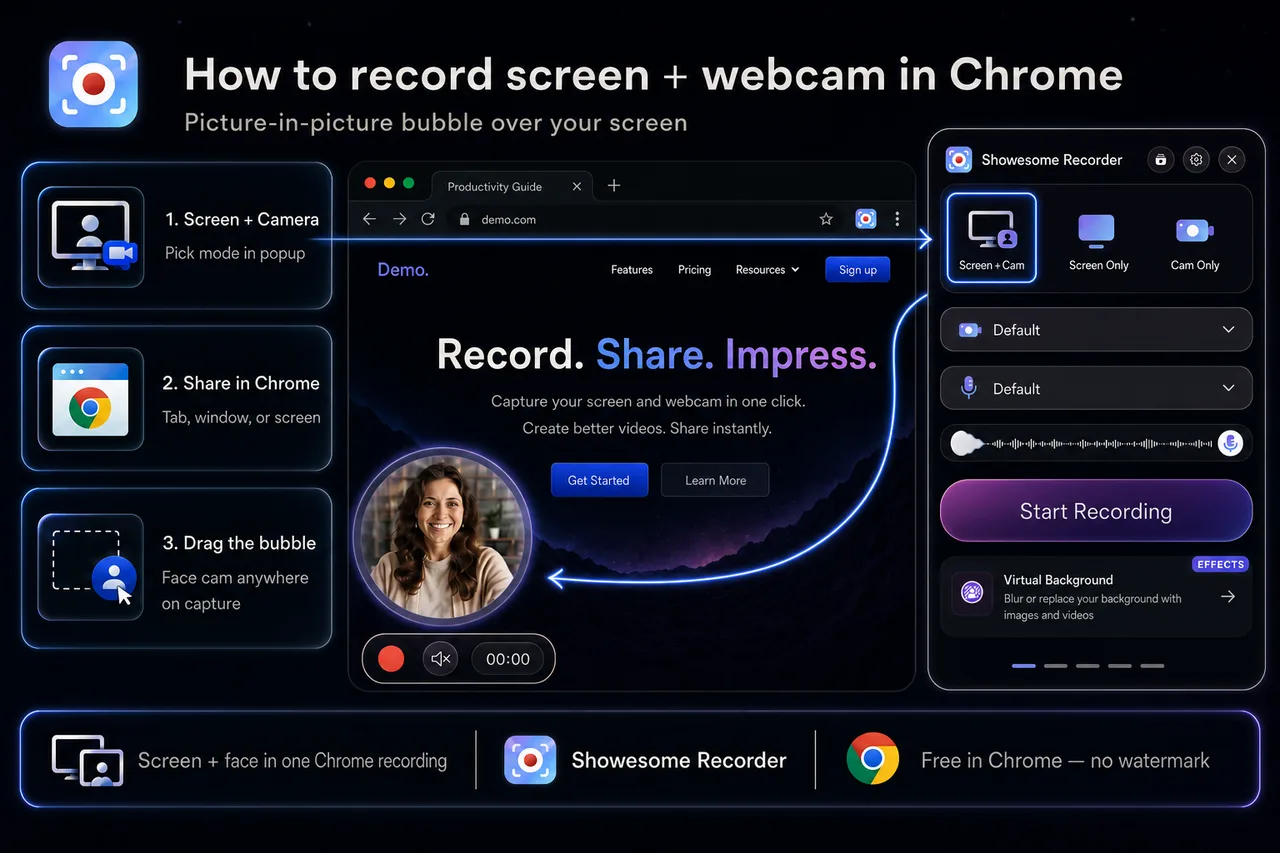
Yes — you can record your screen and webcam together in Chrome. Install Showesome, choose Screen + Camera in the popup, pick what to share in Chrome’s dialog, and your face appears in a draggable picture-in-picture bubble over the capture. No separate desktop app or OBS setup required.
This guide walks through the full flow: mode selection, devices, Chrome’s share picker, bubble placement, and what to do before you export MP4.
Open on watch page (for search and full-screen viewing)
1. Install Showesome and pin it
- Add Showesome Screen Recorder from the Chrome Web Store.
- Open the Extensions menu (puzzle icon) and pin Showesome so the toolbar icon stays visible.
New to Chrome extensions? Enable and pin Showesome covers the full menu path.
2. Choose Screen + Camera
- Click the Showesome icon in the Chrome toolbar.
- At the top of the popup, select Screen + Camera (not Screen Only or Camera Only).
Screen + Camera captures your display and your webcam at the same time. Your screen fills the frame; your camera feed appears as a round bubble you can drag anywhere so it does not cover buttons, menus, or text you are explaining.
For a deeper comparison of all three modes, see recording modes guide.
Screen + Camera in the popup
The Screen + Camera button is the first mode in the row at the top. When it is selected, device pickers for camera and microphone appear below — the same layout as Getting Started step 3.
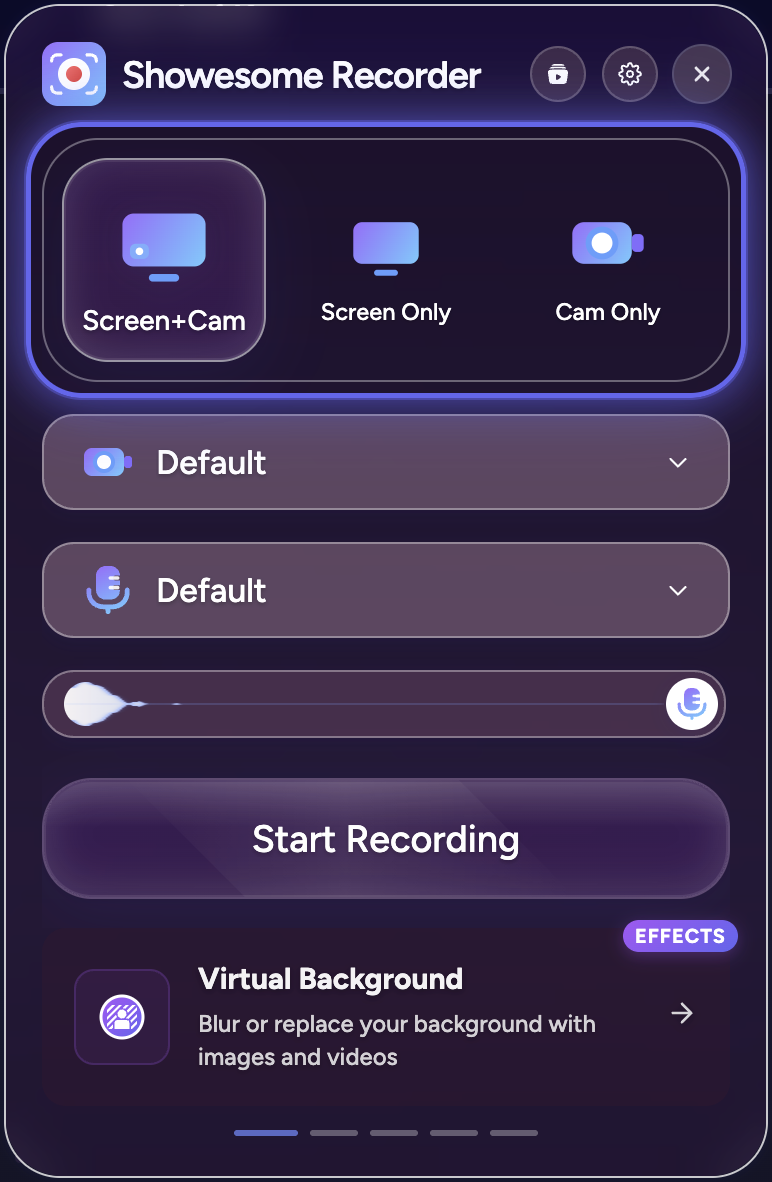
3. Set camera and microphone
Before you record:
- Camera — pick the webcam you want (built-in laptop camera, external USB cam, etc.).
- Microphone — choose your mic and confirm it is not muted if you want narration.
Grant camera and microphone permission when Chrome asks the first time. If the bubble is black or viewers hear no voice, check Chrome site settings and that the correct devices are selected in the popup — see record screen with audio for mic and tab-sound setup.
Optional: open Settings → Virtual Background to blur your room or pick a gallery backdrop. You will see a live preview in the bubble before you hit record — details in the virtual backgrounds guide.
4. Start recording and pick what to share
- Click Start Recording in the popup.
- Chrome opens its share dialog. Choose Chrome tab, Window, or Entire screen depending on what you need.
- For a tab with video or meeting audio, turn on Also share tab audio before you confirm.
- Click Share to begin.
Your screen capture starts immediately. The camera bubble appears on top of the page — drag it to a corner or edge so it stays out of the way of the UI you are demonstrating.
Move the bubble before you talk
Drag the bubble away from toolbars, error messages, and CTAs. For tutorial framing and lighting tips, see webcam setup for tutorials.

5. Record, pause, and stop
Use the floating recording controls bar (start, pause, stop) or keyboard shortcuts — Alt+Shift+S to start/stop, Alt+Shift+P to pause — from any tab. You can hide the control bar in Settings and drive the session from shortcuts alone; the bubble can stay visible. See keyboard shortcuts guide.
When you stop, Showesome saves the clip locally. Open Recordings History from the popup to preview, convert to MP4, or download.
Chrome extension vs OBS for screen + webcam
| Showesome (Chrome extension) | OBS Studio | |
|---|---|---|
| Setup | Install extension, pick Screen + Camera | Install app, add Display + Video Capture sources |
| Webcam overlay | Draggable bubble in-browser | Manual scene layout |
| Best for | Quick tutorials, async updates, tab demos | Multi-source streaming, advanced production |
| Export | Local MP4 from browser | Local file from OBS |
| Watermark | None | None (OBS itself) |
For most Chrome tutorial and demo workflows, a browser extension is faster than configuring OBS scenes. OBS still wins when you need multiple cameras, stream to Twitch, or mix many sources in one production.
Can I move the camera bubble?
Yes. Click and drag the bubble anywhere on the page before or during recording. Place it where it will not cover the UI you are explaining — bottom-right is common, but any corner works.
Do I need OBS to record screen and webcam in Chrome?
No. Showesome records screen + webcam directly in Chrome with a picture-in-picture bubble. OBS is optional if you already run a desktop streaming setup; it is not required for standard tutorial clips.
Can I hide my face but keep the screen?
Switch to Screen Only in the popup before you record — no bubble, just the display capture. See recording modes guide.
Quick checklist
- Pin Showesome in the Chrome toolbar.
- Select Screen + Camera in the popup.
- Choose camera and microphone; unmute if you want voice.
- Click Start Recording → pick tab, window, or screen in Chrome → Share.
- Drag the bubble away from important UI.
- Stop the recording → preview or export MP4 from Recordings History.
Related reading
- Screen + Camera or screen only? — when to use each recording mode.
- Record your screen with audio — microphone, mute, and tab sound.
- Best webcam setup for tutorial videos — lighting, framing, bubble placement.
- Focus Mode tips — spotlight and zoom on UI while you present on camera.
- Getting Started — full walkthrough from install to first export.
- Support — FAQs and troubleshooting for permissions, audio, and recording modes.
Was this guide helpful?
One vote per browser. No account required.
Be the first to share feedback.
Comments
Join the discussion — comments are moderated to keep things helpful. Be respectful and constructive.
Preparing sign-in…