Record your screen with audio: microphone, mute, and tab sound
Set up microphone audio in the Showesome popup, mute or unmute before you record, and capture tab sound from Chrome’s share dialog—stereo audio with noise suppression.
Most screen recordings need audio — your voice, sound from the tab you are sharing, or both. Showesome handles microphone setup in the extension popup; tab and system sound come from what you allow in Chrome’s share dialog when capture starts.
For screen recording with microphone and system audio, you set the mic in Showesome and tab or desktop sound in Chrome — two separate steps, both under your control.
Two kinds of audio
| Source | Where you set it | Best for |
|---|---|---|
| Your voice | Showesome popup — microphone + mute toggle | Narration, tutorials, walkthroughs |
| Tab or desktop sound | Chrome share dialog when you pick tab, window, or screen | Videos, meetings, app audio in the capture |
Microphone audio and tab audio are independent. You can record mic only, tab sound only (unusual but possible), or both for explain-while-the-tab-plays tutorials.
Open on watch page (for search and full-screen viewing)
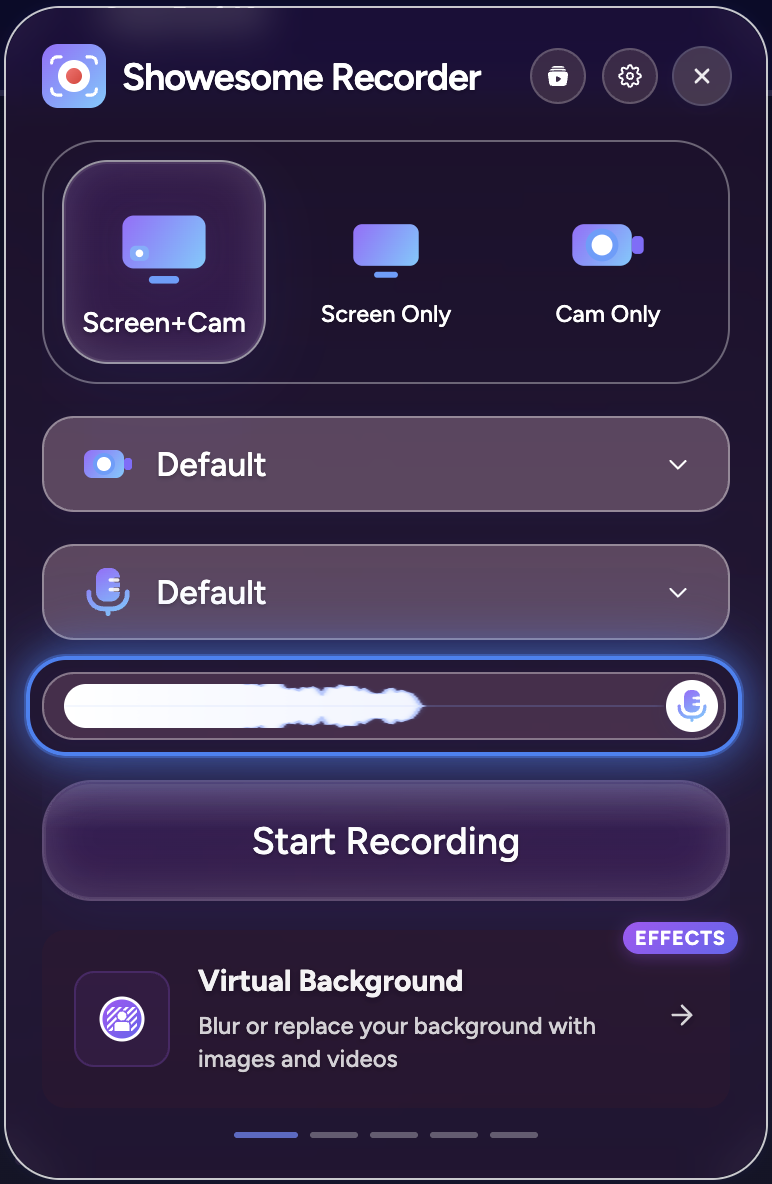
Choose your microphone in the popup
Open Showesome from the Chrome toolbar. Under Screen Only or Screen + Camera, use the device section in the popup:
- Microphone — pick the input you want (built-in, headset, USB mic).
- Mute / unmute — turn the mic off before you record, or mute temporarily without changing devices.
New to Showesome? How to record your screen on Chrome (2026) covers install through first export, or try Getting Started step 4 for the interactive device tour.
Microphone source
Open the Microphone dropdown and choose the input Chrome should use. If a clip sounds hollow or distant, switch to a closer mic (headset or USB) and try a short test recording.

Mute before you start
Use the mute toggle when you do not want narration in a take—for example while you set up a tab or move windows. Unmute before Start Recording when you are ready to talk.
Grant microphone permission when Chrome asks the first time. If viewers hear no voice, check that the mic is unmuted in the popup and that Chrome still allows mic access for the extension.
Audio quality
Showesome records high-quality stereo audio with built-in noise suppression so narration stays clear without extra editing—the same quality called out on the home page feature list. Capture runs at up to 48 kHz for a natural, full-range voice track.
A quiet room and a mic close to you still help more than any setting alone. For camera-heavy tutorials, see webcam setup tips — the audio section there applies to screen + camera clips too.
Sound from the tab, window, or screen
When you click Start Recording, Chrome opens its share dialog. What you can include depends on what you select:
- Chrome tab — turn on Also share tab audio when the tab plays video, music, or meeting audio you need in the file. This is the most common fix when “the recording has no sound from the browser.”
- Window or Entire screen — available audio options depend on Chrome and your operating system.
In Chrome’s picker, enable the audio toggle before you confirm the tab:
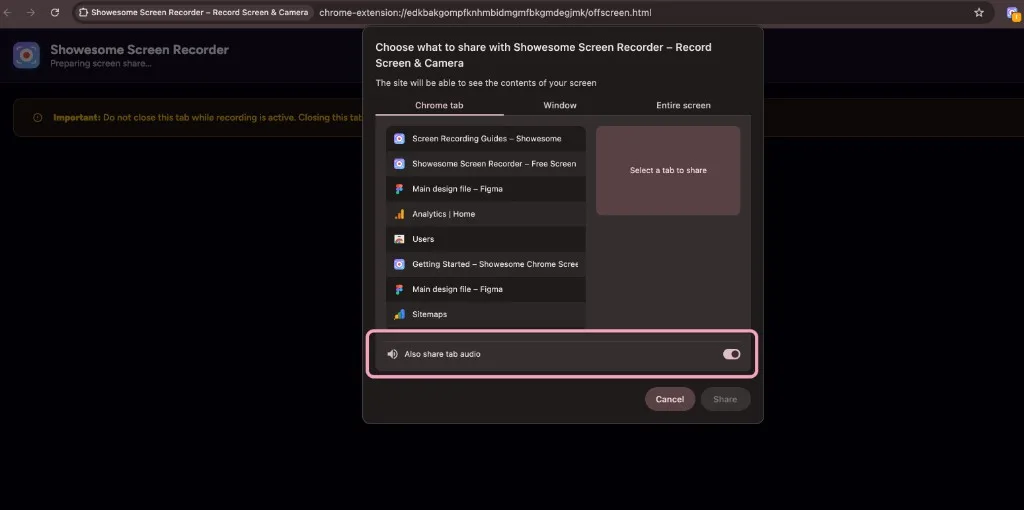
Common mistake: Tab sound and microphone are separate. Even with tab audio enabled, your mic still needs to be unmuted in Showesome if you want narration.
For a tab-first workflow (modes, checklist, export), see How to record a Chrome tab with audio.
No sound in the recording?
- Check that the microphone is not muted in Showesome.
- Confirm Chrome still allows microphone access for the extension.
- Re-record the tab with Also share tab audio enabled in Chrome’s picker.
- Try a short test recording before long meetings or demos.
Can I record tab audio and my microphone at the same time?
Yes — they are separate inputs. Enable Also share tab audio in Chrome's tab picker for page sound, and keep your mic unmuted in Showesome for narration.
Quick checklist
- Pick Screen Only or Screen + Camera in the popup.
- Choose your microphone and confirm the mic is not muted.
- Click Start Recording and select tab, window, or screen in Chrome.
- For a tab, enable Also share tab audio when you need sound from the page.
- Record, then open preview or Recordings History to review before you export MP4.
Related reading
- Screen recording has no sound? — diagnose mic vs tab vs system audio (Mac, Windows, Chrome).
- How to record a Chrome tab with audio — tab picker and Also share tab audio in depth.
- Choosing a recording mode — Screen + Camera vs Screen Only vs Camera Only.
- Getting Started — step 4 devices, then step 5 start recording.
- Support — FAQs and troubleshooting when audio is missing.
Was this guide helpful?
One vote per browser. No account required.
Be the first to share feedback.
Comments
Join the discussion — comments are moderated to keep things helpful. Be respectful and constructive.
Preparing sign-in…