How to record a Google Slides presentation in Chrome
Record a Google Slides presentation in Chrome with Showesome — share the Slides tab, narrate with your mic, use Focus Mode to spotlight charts and bullets, and export MP4 locally.
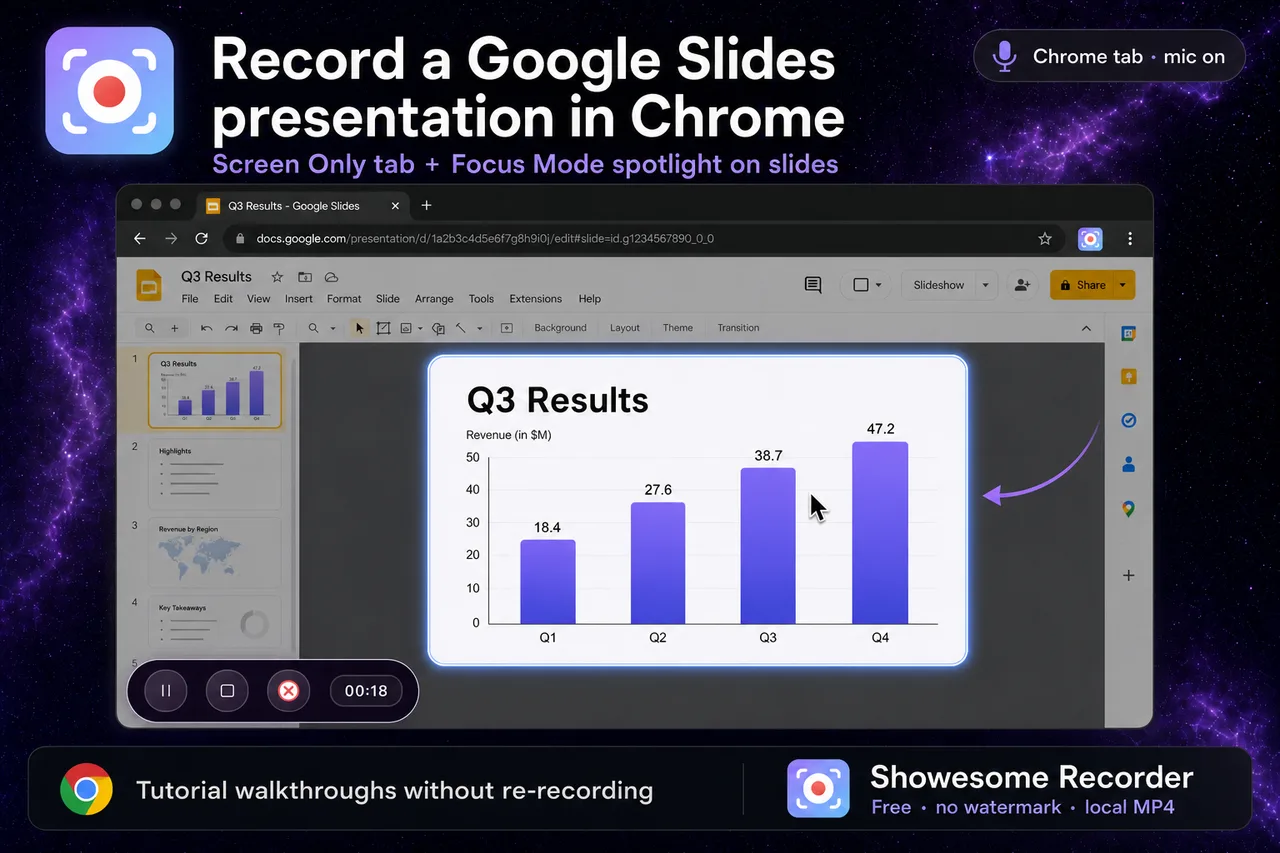
Yes — you can record a Google Slides presentation in Chrome. Open your deck in a Chrome tab, start Showesome, choose Screen Only (or Screen + Camera if you want your face visible), select the Slides tab in Chrome’s share dialog, narrate with your microphone, and use Focus Mode to spotlight charts or bullet points while you present. Export MP4 locally when you finish.
This guide covers tab vs window capture, narration, Focus Mode for slide walkthroughs, and what to do before you hit record.
Open on watch page (for search and full-screen viewing)
What you need
| Requirement | Notes |
|---|---|
| Google Slides in Chrome | slides.google.com or Slides opened from Drive |
| Showesome installed | Chrome Web Store — free |
| Microphone | Built-in or external — for narration over the deck |
| Optional: camera | Screen + Camera puts your face in a draggable bubble |
Slides audio from embedded video clips in the deck may need Also share tab audio in Chrome’s picker — see record a Chrome tab with audio.
1. Open your presentation and enter slideshow (or edit) view
- Open the Google Slides file in Chrome — one tab per deck keeps the share picker simple.
- Choose how you will present:
- Present mode (
Ctrl+Cmd+Enter/Ctrl+F5) — full-screen slides, good for “live lecture” style clips. - Editor view — better when you want thumbnails visible or you are building the deck while narrating.
- Present mode (
Close unrelated tabs in the same window if they might flash in Chrome’s tab picker.
2. Pick Screen Only or Screen + Camera
Click the Showesome icon and choose a mode:
| Mode | Best for |
|---|---|
| Screen Only | Deck-only tutorials, LMS uploads, internal training |
| Screen + Camera | Teacher or trainer clips with face + slides — recording modes guide |
| Camera Only | Talking-head intro without slides — rarely the main choice for Slides |
Set Microphone on and confirm you are not muted. Check levels in the popup before you record — record screen with audio.
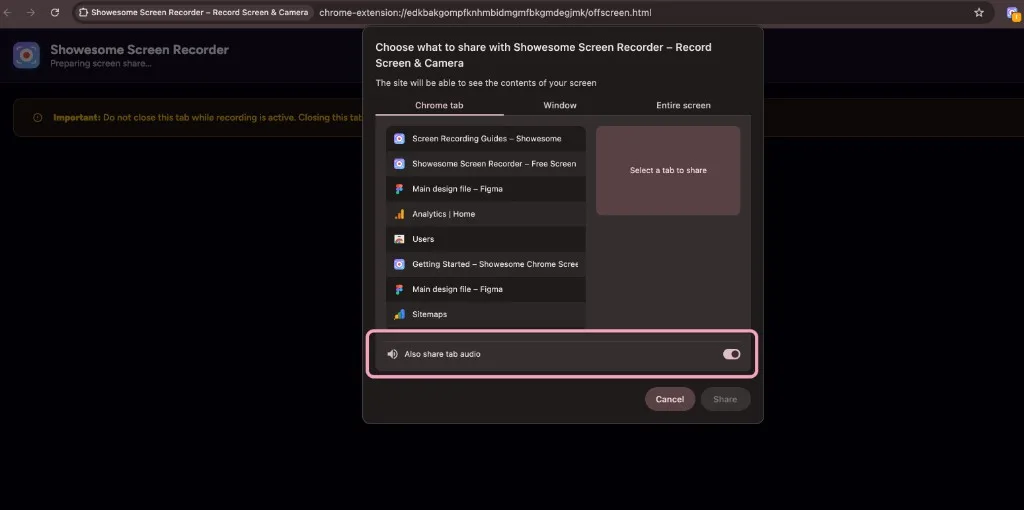
3. Start recording and share the Slides Chrome tab
- Click Start Recording in the Showesome popup.
- In Chrome’s Choose what to share dialog, select Chrome tab.
- Pick the tab titled with your presentation (Google Slides favicon).
- If the deck includes embedded video with sound, enable Also share tab audio.
- Click Share.
For a full install-to-export walkthrough, see how to record your screen on Chrome (2026).
4. Present and narrate
- Advance slides with arrow keys or click — your narration is captured from the microphone, not Slides itself.
- Pause with
Alt+Shift+Pif you need a break without stopping — keyboard shortcuts. - Keep the Showesome control bar visible unless you prefer shortcuts only.
Tip: Record in one continuous take per section, then trim in an editor if needed — or record shorter chapter clips (intro slide, demo slide, recap) as separate files.
5. Use Focus Mode to spotlight slide elements
Flat slide recordings lose viewers when everything on the slide is the same size. Focus Mode lets you click a chart, bullet, or image during recording and Showesome spotlights and zooms that area — no post-production keyframes.
- While recording, double-tap Cmd (Mac) or Ctrl (Windows/Linux) to enter Focus Mode.
- Click the chart, callout, or bullet you are explaining.
- Select text to zoom readable copy or code on the slide.
- Shift + drag for a rectangular spotlight when several items belong together.
- Double-tap Cmd/Ctrl again or press Esc to return to the full slide.
Full walkthrough: Auto zoom for screen recordings in Chrome and Focus Mode tips.
Screen Only vs entire screen for Slides
| Capture choice | When to use |
|---|---|
| Chrome tab (recommended) | Only the Slides tab — cleanest for tutorials |
| Window | Slides plus another app in the same window — rarely needed |
| Entire screen | Avoid unless you deliberately want desktop + notifications visible |
Tab capture also keeps Chrome’s Also share tab audio toggle available for embedded media.
Can I record Google Slides without Showesome?
Chrome has no built-in “record this Slides deck with mic + export MP4” flow. Alternatives include OBS (desktop), Loom (hosted link), or Meet/Zoom screen share (different workflow and policies). Showesome fits local MP4, no watermark, and Focus Mode during capture — see choosing a screen recorder.
Do I need tab audio for a normal slide deck?
Usually no — narration comes from your microphone. Enable Also share tab audio only when the slide includes video, animation with sound, or embedded audio you need in the recording.
Export and share
- Stop recording (
Alt+Shift+Sor the control bar). - Open Recordings History → preview your clip.
- Convert to MP4 if needed → Download MP4 — convert WebM to MP4 in Chrome.
- Upload to your LMS, Drive, or team chat — optional cloud upload: preview and cloud guide.
Related reading
- Record a Chrome tab with audio — tab picker and Also share tab audio.
- Auto zoom without editing — Focus Mode for tutorials.
- Short tutorial clips beat one long walkthrough — split long decks into chapters.
- Support — FAQs on modes, Focus Mode, and export.
Quick checklist
- Open Slides in Chrome → present or edit view.
- Showesome → Screen Only (or Screen + Camera) → mic on.
- Start Recording → Chrome tab → select Slides tab.
- Narrate; double-tap Cmd/Ctrl → click charts/bullets for Focus Mode zoom.
- Stop → preview → export MP4.
Was this guide helpful?
One vote per browser. No account required.
Be the first to share feedback.
Comments
Join the discussion — comments are moderated to keep things helpful. Be respectful and constructive.
Preparing sign-in…