Chrome tab, window, or entire screen: which should you share?
After Start Recording, Chrome asks for a tab, a window, or the entire screen. Tab audio needs a Chrome tab and Also share tab audio. Entire screen includes the desktop.
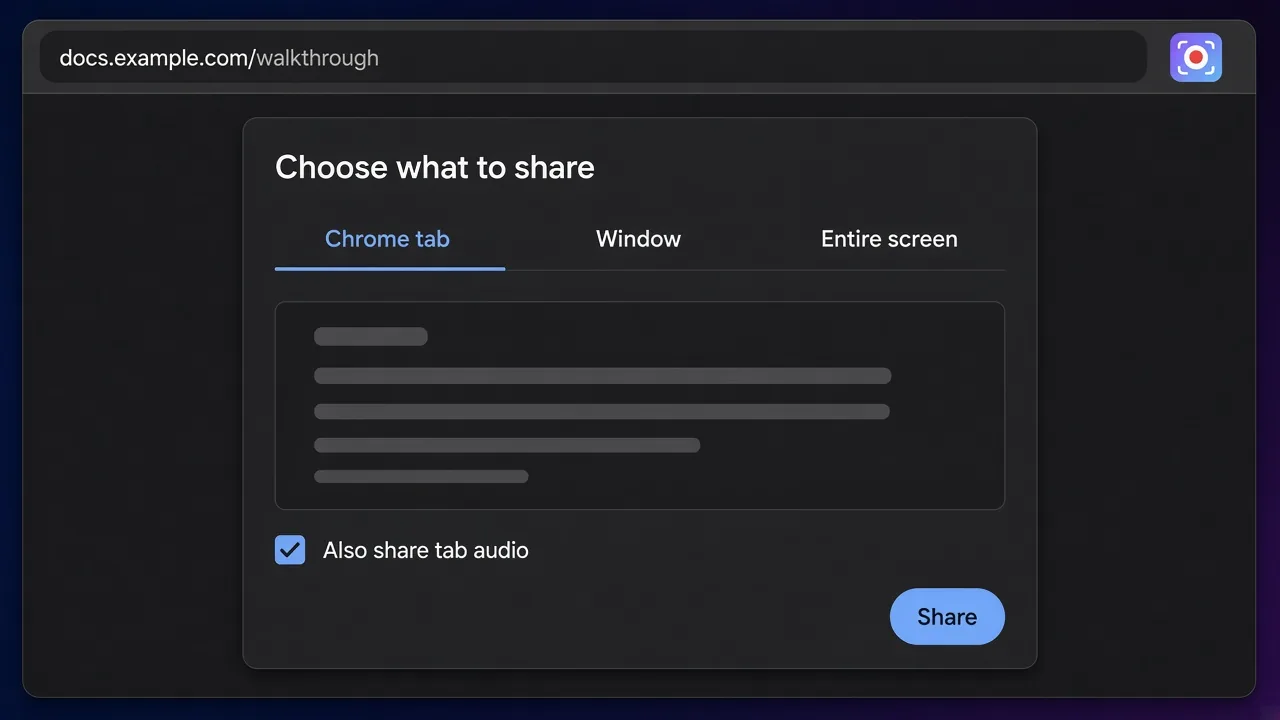
The share target is what ends up in the file. Click Start Recording in Showesome and Chrome opens its share dialog. Choose Chrome tab, Window, or Entire screen, then click Share. Showesome records that surface.
Also share tab audio is Chrome’s switch for sound playing in a tab. Turn it on when you share a Chrome tab. Your voice is separate: pick the Microphone in the Showesome popup and leave it unmuted when you want narration.
Open on watch page (for search and full-screen viewing)
What each target puts in the clip
| Share target | What the clip shows | Sound besides your microphone |
|---|---|---|
| Chrome tab | One tab — a demo, a doc, YouTube, or Google Slides | Also share tab audio, when that tab is playing sound |
| Window | One app window, such as desktop PowerPoint | Whatever Chrome and your operating system offer for that window. Tab audio does not capture a desktop app. |
| Entire screen | The full desktop, including every monitor Chrome can see, and notifications that appear | Unreliable for browser playback. Share a Chrome tab when you need sound from a site. |
Camera Only skips this dialog. That mode records the webcam. Use Screen Only or Screen + Camera when the clip needs a tab, a window, or the desktop. Recording modes.
1. Name what the viewer must see
- One website — a product demo, a doc, YouTube, Google Slides, or a Meet or Zoom tab you host. Choose Chrome tab.
- One desktop app — PowerPoint on the desktop, or another single window. Choose Window.
- The whole desktop — every monitor Chrome can see, and any notification that appears while you record. Choose Entire screen when that desktop is the subject.
A bug in one tab stays clearer as a Chrome tab. A bug that spans panels in the same app fits a Window. Bug report recordings.
2. Pick Screen Only or Screen + Camera
- Add Showesome Screen Recorder from the Chrome Web Store and pin it. Enable and pin.
- Open the popup. Choose Screen Only or Screen + Camera.
- Set the Microphone. Unmute it when you want narration. Microphone audio and tab audio stay independent. Record your screen with audio.
- Screen + Camera puts your face in a draggable bubble on the capture. Drag the bubble off the UI you are explaining. Record screen with webcam.
3. Choose the target in Chrome’s share dialog
- Click Start Recording.
- Select Chrome tab, Window, or Entire screen.
- Click the thumbnail for the tab or window you want.
- Click Share.
Chrome can reopen on the last share choice. Select the target again if the previous clip used a different one.
The capture uses that surface at its native resolution. A 4K monitor shared as Entire screen or Window can export at 3840×2160 when the display supports it. A 1080p laptop stays 1920×1080. A Chrome tab follows the tab’s captured area, which can be smaller than the full desktop. 4K screen recording in Chrome.
4. Turn on Also share tab audio for a Chrome tab
- Select Chrome tab.
- Pick the tab that is playing the sound.
- Turn Also share tab audio on.
- Unmute the site if the tab shows a muted speaker. Chrome does not record tab audio from a muted tab.
- Click Share.
The Also share tab audio toggle often does not appear for Window or Entire screen. Audio options on those targets depend on Chrome and your operating system. Desktop app sound is not Chrome tab audio, so keep the microphone on for your voice. Share tab audio missing.
DRM sites such as Netflix block capture. Record a deck, a doc, or another page you control.
5. Leave private content off the surface you share
An Entire screen share includes the desktop and notifications that appear during the take. Showesome does not blur, mask, or redact passwords, notifications, emails, or any other on-screen content.
Share a Chrome tab or a Window when the rest of the desktop should stay out of the file. Dismiss notifications yourself before you share the entire screen, and move private content off the surface you are about to record.
Hiding the control bar only hides Showesome’s own stop and pause bar. Open Settings → Recording & Video and turn off Recording Controls when you want that bar gone. Alt+Shift+S still stops, Alt+Shift+P still pauses, and Alt+Shift+C still cancels. On Mac, Chrome labels the modifier Option. The page stays in the capture. Keyboard shortcuts.
While you record, Focus Mode can spotlight a click, a text selection, or a dragged area and dim the surroundings. Double-tap Cmd (Mac) or Ctrl (Windows/Linux), then click, select, or drag. Press Esc to leave Focus Mode. Dimming does not remove page content. Focus Mode tips.
6. Stop and export on this device
- Stop with Alt+Shift+S or the stop square on the control bar. Alt+Shift+C or the red X discards the session and saves nothing.
- Open Recordings History. The clip is saved in Chrome on this device. It is not in Downloads until you export.
- Download WebM, or Convert to MP4. Conversion runs on your device. Showesome does not add a watermark.
- Google Drive, Dropbox, or YouTube receive a copy only after you connect that service and upload the clip you choose. Where recordings are saved.
Incognito recording works after Allow in Incognito is on for Showesome at chrome://extensions. Incognito guide.
Which target should I use for a tutorial?
Chrome tab for a site, a doc, or slides in the browser. Window for one desktop app. Entire screen when the desktop itself is the subject.
Why is Also share tab audio missing?
The dialog is on Window or Entire screen, the toggle is off, or the tab is muted. Select Chrome tab, turn Also share tab audio on, and unmute the site.
Does Entire screen hide notifications?
No. An entire-screen share includes the desktop and notifications that appear. Showesome does not blur, mask, or redact on-screen content. Share a tab or a window when those should stay out of the clip, or dismiss them before you record.
Does Camera Only open the share dialog?
No. Camera Only records the webcam and skips Chrome’s share dialog. Choose Screen Only or Screen + Camera to share a tab, a window, or the screen.
Quick checklist
- Choose Screen Only or Screen + Camera, and set the microphone.
- Click Start Recording.
- Choose Chrome tab for one site and for tab audio, Window for one app, or Entire screen when the desktop should be in the file.
- On a tab with sound, turn on Also share tab audio and unmute the site.
- Stop, then export MP4 or WebM from Recordings History. The file stays on this device unless you upload it.
Related reading
- How to record your screen on Chrome (2026) — install, the share dialog, and export.
- How to record a Chrome tab with audio — the tab picker and Also share tab audio.
- Share tab audio missing in Chrome? — window versus tab, mute, and DRM.
- Record your screen with audio — microphone, mute, and tab sound.
- Screen + Camera or screen only? — the mode you pick before the share dialog.
- How to record a PowerPoint presentation in Chrome — a web tab versus the desktop window.
- 4K screen recording in Chrome — native resolution of the surface you share.
- Support — recording, tab audio, and export.
Was this guide helpful?
One vote per browser. No account required.
Be the first to share feedback.
Comments
Join the discussion — comments are moderated to keep things helpful. Be respectful and constructive.
Preparing sign-in…